VOC2007 dataset で遊ぶ① (2019/01/26)
かえるるる(@kaeru_nantoka)です。
今回はかねてより segmentation task に取り組みたいなあ と思っていた私が、手頃なデータ落ちてないかな〜とネットサーフィンをしていたところ tarファイルで 480MB という頑張ったらローカルで云々できそうなデータセットを見つけたので、云々した物語の第一弾です。
それでは、VOC2007データセットで遊ぶ① と称して
VOC2007データセットのダウンロード ~ train_dfの作成 ~ リサイズ ~ img画像と mask画像の可視化
までを残していこうと思います。
ソースコードは ↓ です。
https://github.com/osuossu8/Play_With_VOC2007/blob/master/get_idx_name_and_mk_train_df.ipynb
ちなみに環境は、Google Colab です。
(...いいぱそこんほしい。。。)
参考 URLs
data の準備 :
https://qiita.com/tktktks10/items/0f551aea27d2f62ef708
train_dfの作成:
https://www.kaggle.com/shaojiaxin/u-net-with-simple-resnet-blocks-v2-new-loss
まず、データをここ(http://host.robots.ox.ac.uk/pascal/VOC/voc2012/#devkit)から落としてきます。
次に、tar ファイルを解凍します。
!tar -xvf "/content/drive/My Drive/VOCtrainval_06-Nov-2007.tar"
/content/ 配下に解凍されました。
[in]
import os
os.listdir("/content/VOCdevkit/VOC2007/")

[out]
['SegmentationObject',
 'Annotations',
 'JPEGImages',
 'ImageSets',
 'SegmentationClass']
中身は ↑ のようになっています。 今回使うのは、JPEGImages(元画像), SegmentationObject(マスク画像) の二つです。
これらの配下に、 'hogehoge.jpg' や 'piyopiyo.png' といった形で画像が入っています。
最終的には、画像を pixel の numpy.array に変換して保持します。
Kaggle の塩コンペの kernel を参考に実装していきました。
img_path = "/content/VOCdevkit/VOC2007/JPEGImages"
mask_path = "/content/VOCdevkit/VOC2007/SegmentationObject"
import os

def get_idx_name(path):
  idx = os.listdir(path)
  idx_name = []
  for i in range(len(idx)):
    idx_name.append(os.path.splitext(idx[i])[0])
  return idx_name
まず、画像ファイル名の拡張子以外の部分を抜き出します。↑
[in]
img_idx = get_idx_name("/content/VOCdevkit/VOC2007/JPEGImages")
mask_idx = get_idx_name("/content/VOCdevkit/VOC2007/SegmentationObject")
print(len(img_idx), img_idx[:3])
print(len(mask_idx), mask_idx[:3])

[out]
5011 ['006473', '008023', '009659']
422 ['000661', '005859', '009950']
↑ を見ると、segmentation と対になっている元画像が422枚しかないようです。 segmentation 画像のある元画像を抜き出してみます。
[in]
img_has_mask_idx = set(img_idx) & set(mask_idx)
img_has_mask_idx = list(img_has_mask_idx)

print(len(img_has_mask_idx), sorted(img_has_mask_idx)[:3])
print(len(mask_idx), sorted(mask_idx)[:3])

[out]
422 ['000032', '000033', '000039']
422 ['000032', '000033', '000039']
これで使いたい画像のインデックスを集めることができました。 次にこれをもとに画像を取得して pixelの numpy.arrayにしたものを df[img], df[mask] というカラムに格納します。
まず使うライブラリを宣言して
import pandas as pd
import numpy as np
import matplotlib.pyplot as plt
plt.style.use('seaborn-white')
import seaborn as sns
sns.set_style("white")

%matplotlib inline

from keras.preprocessing.image import array_to_img, img_to_array, load_img
train_df = pd.DataFrame()
train_df["images"] = [np.array(lod_img(img_path + "/{}.jpg".format(idx))) / 255 for idx in sorted(img_has_mask_idx)[:100]]
train_df["masks"] = [np.array(load_img(mask_path + "/{}.png".format(idx), color_mode="grayscale")) / 255 for idx in sorted(mask_idx)[:100]]
こんな感じになります。
[in]
train_df.images[0].shape, train_df.masks[0].shape

[out]
((281, 500, 3), (281, 500))
このままだと、縦横の長さが異なるので一旦縦に合わせてリサイズします。 コードは、塩コンペのカーネルにあったものを流用しています。
from skimage.transform import resize

img_size_ori = train_df.images[0].shape[0]
img_size_target = 101

def upsample(img):# not used
    if img_size_ori == img_size_target:
        return img
    return resize(img, (img_size_target, img_size_target), mode='constant', preserve_range=True)

def downsample(img):# not used
    if img_size_ori == img_size_target:
        return img
    return resize(img, (img_size_ori, img_size_ori), mode='constant', preserve_range=True)
[in]
img_resize = downsample(train_df.images[0])
msk_resize = downsample(train_df.masks[0])

img_resize.shape, msk_resize.shape

[out]
((281, 281, 3), (281, 281))
揃いました。
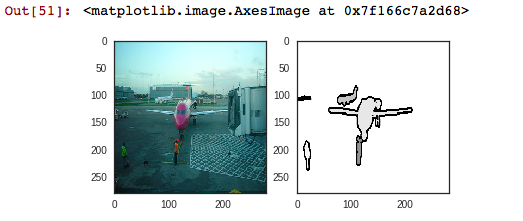
あとは、plt.imshow()したら終わりです。お疲れ様でした。
plt.subplot(1, 2, 1)
plt.imshow(img_resize)

plt.subplot(1, 2, 2)
plt.imshow(msk_resize)

結び
野生のデータを取得して、過去コンペのソースを頼りに欲しい形にデータを整形し、データセットを作ることができました。 train, mask 420枚づつと少々物足りないですが、augmentation などで水増しすることなどを含めて遊んでいこうと思います。
ありがとうございました。
[おまけ] 筆者が、 plt.imshow()と間違えて、plt.plot() してしまった時の写真。

おぞましすぎる。。